Showing posts with label windows 10. Show all posts

Saturday, 11 July 2020

How to enable the new Start menu in Windows 10

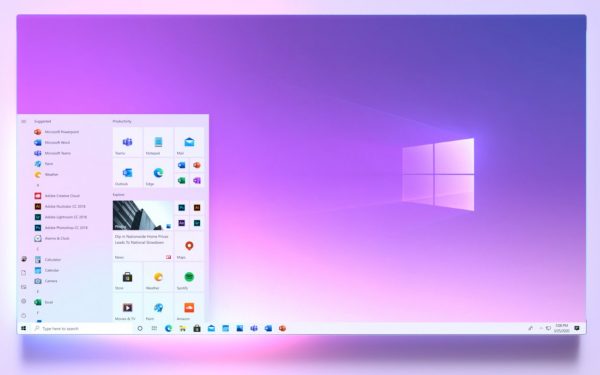
After giving us a tease of a redesign, Microsoft rolled out the new look Start menu in Windows 10 build 20161.

But while there was a great deal of excitement about the cleaner, more refined look complete with translucent backgrounds, many Windows users were disappointed to find that the new Start menu was not available to everyone. Here's what you need to do to see the new Start menu.


As the new Start menu is still undergoing testing, it is only available to people who are running Windows 10 build 20161 which is available in the Dev Channel. But just having the correct build of the operating system installed is not enough. Microsoft is conducting A/B testing, so only a subset of Insiders will see the redesigned Start menu.

Unless, of course, you cheat. As shared by WindowsUnited, there is a handy utility called ViveTool which can be used to manually activate the new Start menu.

Here's what to do:

  • Download ViveTool here and extract the contents of the archive.
  • Click the Start button, type cmd, right click the Command Prompt icon and select Run as administrator.
  • Click Yes in the User Account Control dialog and switch to the folder you extracted ViveTool tool; for example: cd C:\Users\Mark\Desktop\ViveTool.
  • Now enter the command ViVeTool.exe addconfig 23615618 2 and press Enter.
  • Restart your computer and when Windows loads you should be able to see the new Start menu.


Thursday, 9 July 2020

How to uninstall Microsoft Edge from Windows 10

Microsoft has been quite aggressive in launching the Chromium-based version of Edge, and not everyone is happy about it.


It is understandably irritating to have a browser that does not necessarily need to be installed - and to further insult the injury, Microsoft has made it impossible to uninstall Edge. But there is a way to get rid of the browser. Here's what you need to know.

You may have decided that you would like to stay in the browser of your choice, as long as it is not Edge. This is perfectly reasonable, and after making that decision, why should you install Edge? There is no need to limit yourself to what Microsoft says you can and cannot do.

The company decided that you can uninstall Edge if you installed it manually (although there is no guarantee that you will not receive it again). If you installed it through Windows Update, you can remove the browser not available in the settings. However, you can go to the command prompt.

  1. Click the Start button, type cmd, right-click Command Prompt and select Run as administrator
  2. Type C:\Program Files (x86)\Microsoft\Edge\Application\83.0.478.58\Installer and press Enter
  3. Type setup.exe --uninstall --system-level --verbose-logging --force-uninstall and press Enter
You will find that the new version of Edge is no longer available and the old non-Chromium edition is available again.

Wednesday, 20 November 2019

WLAN-Kennwort unter Windows 10 mit CMD suche

WLAN-Kennwort, unter Windows 10, mit CMD, Deutsche2, windows 10, wilirax, wilirax designs
WLAN-Kennwort unter Windows 10 mit CMD suchen

Das Auffinden von Wi-Fi-Passwörtern mit CMD aller verbundenen Netzwerke ist sehr einfach. Sie können es mit ein paar cmd-Befehlen finden. Diese Methode funktioniert auch, wenn Sie offline oder mit dem WiFi-Netzwerk verbunden sind. Wenn wir eine Verbindung zu einem WiFi-Netzwerk herstellen und das Passwort eingeben, um dieses Netzwerk zu verbinden, erstellt es ein WLAN-Profil dieses WiFi-Netzwerks. Dieses Profil wird von unserem Computer auf dem Windows-Laufwerk gespeichert, um später auf die erforderlichen Details zuzugreifen.
Anhand dieses Netzwerkprofils werde ich Ihnen beibringen, wie Sie einige cmd-Befehle verwenden und die Details zum WiFi-Netzwerk abrufen.

1. Öffnen Sie zuerst die Eingabeaufforderung als Administrator.
WLAN-Kennwort, unter Windows 10, mit CMD, Deutsche2, windows 10,


2. Im nächsten Schritt möchten wir alle Profile kennen, die auf unserem Computer gespeichert sind. Geben Sie daher den folgenden Befehl in die Befehlszeile ein:
netsh wlan show profile

WLAN-Kennwort, unter Windows 10, mit CMD, Deutsche2, windows 10,


3. Dieser Befehl listet alle WiFi-Profile auf, mit denen Sie jemals eine Verbindung hergestellt haben.

WLAN-Kennwort, unter Windows 10, mit CMD, Deutsche2, windows 10, wilirax


4. Wie Sie in der obigen Abbildung sehen können, gibt es zwölf WiFi-Netzwerke, mit denen ich eine Verbindung herstelle. Lassen Sie uns in diesem Fall das Passwort für das WiFi-IT-MIS herausfinden.


5. Geben Sie den folgenden Befehl ein, um das Kennwort eines beliebigen WLAN-Netzwerks anzuzeigen:
netsh wlan Profil anzeigen WiFi-Name key = clear
Der Befehl lautet wie folgt:
netsh wlan Profil anzeigen IT-MIS key = clear

WLAN-Kennwort, unter Windows 10, mit CMD, Deutsche2, windows 10, wilirax, wilirax designs


6. In den Sicherheitseinstellungen sehen Sie unter "Schlüsselinhalt" das WLAN-Passwort des jeweiligen Netzwerks.

WLAN-Kennwort, unter Windows 10, mit CMD, Deutsche2, windows 10, wilirax, wilirax designs

Neben der Kenntnis des Windows 10-WLAN-Kennworts können Sie dieses Ergebnis auch verwenden, um Ihr WLAN weiter zu optimieren. Unter den Profilinformationen sehen Sie beispielsweise, dass die Mac-Randomisierung deaktiviert ist. Sie können die MAC-Zufallsfunktion aktivieren, um zu vermeiden, dass Ihr Standort anhand der MAC-Adresse des Geräts verfolgt wird.

Find WiFi Password On Windows 10 Using CMD


CMD, English2, Find WiFi Password, wifi password, windows 10, wilirax, wilirax design,


To Find Wi-Fi Password Using CMD Of All Connected Networks is very easy. You can find it with a few cmd commands. This method works even if your offline or connected to the WiFi network. When we connect to a WiFi network and enter the password to connect that network it makes a WLAN profile of that WiFi network. That profile is stored by our computer on windows drive to access it for later required details.
With the help of that network profile, I will teach you how to use few cmd commands and get the details about the WiFi network.

1. First, open the command prompt as administrator.

CMD, English2, Find WiFi Password, wifi password, windows 10, wilirax, wilirax design,

2. In the next step, we want to know about all the profiles that are stored on our computer. So, type the following command in the cmd:
netsh wlan show profile

CMD, English2, Find WiFi Password, wifi password, windows 10, wilirax, wilirax design,

3. This command will list out all the WiFi profiles that you have ever connected to.

CMD, English2, Find WiFi Password, wifi password, windows 10, wilirax, wilirax design,

4. In the above picture, as you can see, there are twelve WiFi networks that I connect to. So, let’s go and find out the password for the WiFi ‘IT-MIS’ in this case.

5. Type the following command to see the password of any WiFi network:
netsh wlan show profile WiFi-name key=clear
The command will be like:
netsh wlan show profile IT-MIS key=clear

CMD, English2, Find WiFi Password, wifi password, windows 10, wilirax, wilirax design,

6. Under the security settings, in the ‘key content’, you see the WiFi password of that particular network.

CMD, English2, Find WiFi Password, wifi password, windows 10, wilirax, wilirax design,

Besides knowing the Windows 10 WiFi password, you can also use this result to optimize your WiFi further. For example, Under the profile information, you can see mac randomization is disabled. You can turn on the MAC randomization feature to avoid your location tracking based on the device’s MAC address.
If you are also aware of some more tricks and tweaks like this, please put them in the comment below. I would be happy to feature some of those in our next articles. Thank You.


Tuesday, 12 November 2019

Blinkende / flackernde Google Chrome-Seiten Windows 10


google chrome, blinkende, flackernde, windows 10, Deutsche2,


Ich habe dieses Problem erst nach dem letzten Update entdeckt. Es wurden nur wenige Personen auf Google mit dem gleichen Problem gesucht und gefunden. Wie behebe ich dieses Problem? Die Lösung ist sehr einfach.

Lösung:

Haben Sie Ihren Desktop-Hintergrund so eingestellt, dass er sich mit der Zeit ändert? Windows wählt automatisch eine Akzentfarbe aus, die Ihren Desktop-Bildern entspricht. Dies führt zu einem Problem mit den Registerkarten Flackern / Blinken / Blinken.


google chrome, blinkende, flackernde, windows 10, Deutsche2,

Einfache Korrektur, gehen Sie zu Einstellungen -> Personalisierung -> Farben und deaktivieren Sie das Kontrollkästchen "Automatisch eine Akzentfarbe auswählen". Diese Korrektur hat bei mir funktioniert. Sie können es testen, indem Sie Chrome mit wenigen Tabs öffnen und mit der rechten Maustaste auf den Desktop klicken. Wählen Sie "Next Desktop Background" und prüfen Sie, ob Chrome flackert. Wenn die Option "Akzentfarbe automatisch auswählen" deaktiviert ist, flackert sie nicht mehr. Ich hoffe, diese Lösung funktioniert für Sie. Wenn Sie Fragen haben oder eine andere Lösung haben, teilen Sie diese bitte in den Kommentaren unten mit. Einen schönen Tag noch.

Thursday, 24 October 2019

Windows 10-Tastenkombinationen - Oktober 2019

Nie wieder die Maus benutzen!


Windows 10-Tastenkombinationen - Oktober 2019 wilirax


Auch wenn eine Maus das Navigieren und Interagieren erleichtert, mache ich Dinge so oft wie möglich mit der Tastatur. Warum? Damit ich viel schneller bin und meine Hand nicht ständig bewegen muss, um die Maus zu benutzen. Wenn Sie auch eine Tastatur benutzen, werden Sie diese Tastaturkürzel lieben. Im Folgenden finden Sie eine praktische Liste der nützlichsten Tastenkombinationen für die Navigation in Windows 10. Möglicherweise ist es auch hilfreich zu wissen, wie Sie Programme mit Tastenkombinationen in Windows 10 öffnen.


1. ⊞  + D  - Mac-Benutzer können darüber sprechen, wie ihre ausgefallenen mausfähigen Hot Corners sie auf den Desktop blicken lassen, ohne etwas zu schließen, aber mit dieser Verknüpfung können Sie dasselbe tun. Drücken Sie diese Taste, um zwischen dem Desktop und allen geöffneten Fenstern umzuschalten. Wenn Sie nach dem Drücken der Verknüpfung mit dem Desktop interagieren, können Sie die Minimierung der Fenster nicht mehr aufheben und müssen sie manuell erneut maximieren.

2. Alt  + Tab    - Die klassische Tastenkombination zum Wechseln zwischen Fenstern bietet eine schöne Vorschau jedes Fensters. Halten Sie die Tastenkombination gedrückt, um zwischen den Fenstern zu wechseln. Lassen Sie sie dann los, wenn Sie das gewünschte Fenster markiert haben.

3. Ctrl  + Alt  + Tab     - Mit dieser Schnellverknüpfung können Sie alle Apps anzeigen, die derzeit auf Ihrem Desktop geöffnet sind. Es sieht auf einen Blick wie Alt + Tab aus, verschwindet jedoch nicht, wenn Sie die Tasten loslassen, und Sie können jedes Fenster in der Vorschau mit der Tastatur oder der Maus geduldig auswählen oder schließen.

4. ⊞  + Ctrl + D - Das Hinzufügen von virtuellen Desktops ist eine der besten Möglichkeiten für Windows 10. Mit dieser schnellen Tastenkombination können Sie einen neuen virtuellen Desktop erstellen und öffnen.

5. ⊞  + Ctrl  + Left or Right Arrow Keys - Wenn Sie mehrere virtuelle Desktops für verschiedene Arbeiten geöffnet haben, verwenden Sie diese Tastenkombination, um zwischen den virtuellen Desktops zu navigieren.

6. ⊞  + Ctrl +  F4  - Mit dieser Verknüpfung können Sie einen virtuellen Desktop schnell schließen. Keine Sorge - alle auf dem virtuellen Desktop geöffneten Programme werden in den Arbeitsbereich des Hauptdesktops übertragen.

7. ⊞  + Tab     - Über diese Verknüpfung können Sie auf die neue Task-Ansichtsfunktion in Windows 10 zugreifen, mit der alle geöffneten Programme und Ihre virtuellen Desktops angezeigt werden.

8. ⊞  + Arrow Keys - Das Ausrichten von Fenstern wurde in Windows 10 erheblich verbessert. Mit der Tastenkombination ⊞ + Pfeiltasten können Sie Fenster schnell an einer beliebigen Ecke Ihres Bildschirms ausrichten. Mit den Pfeilen nach links und rechts wird das Fenster an diesen Seiten des Bildschirms ausgerichtet, während mit den Pfeilen nach oben und unten die Fenster an den Ecken ausgerichtet werden. Durch zweimaliges Drücken von ⊞ + Nach oben oder Nach unten wird ein Fenster im Vollbildmodus angezeigt bzw. minimiert.

9. ⊞  + P  - Wechseln Sie zwischen verschiedenen Anzeigen, wenn Sie eine angeschlossen haben. Mit dieser einfachen Verknüpfung können Sie in den Anzeigeeinstellungen zwischen verschiedenen Multi-Monitor-Setups wechseln und die Anzeige auf den zweiten Bildschirm erweitern, duplizieren oder auf dem zweiten Bildschirm anstelle des ersten Bildschirms anzeigen.

10. ⊞  +  I  - Mit dieser einfachen Verknüpfung können Sie schnell das Fenster Alle Einstellungen öffnen. Da Microsoft langsam alle Elemente des Control Panels mit der modernen Settings-App vereint, ist dies eine der nützlichsten Verknüpfungen von Windows 10.

11. ⊞  +  A  - Eines der besten Dinge in Windows 10 ist der Focus Assist (früher als Action Center bekannt). Mit dem Tastaturkürzel Win + A können Sie alle aktuellen Benachrichtigungen im Bereich leicht öffnen und anzeigen. Es ist nicht erforderlich, auf dieses kleine Symbol in der Taskleiste zu klicken.

12. ⊞  + S  - Suche / Cortana, das als persönlicher digitaler Assistent fungiert, ist eine der größten Neuerungen in Windows 10. Um Cortana schnell zu starten, können Sie diese Tastenkombination verwenden. Wenn Sie dies tun, wird Cortana im Tastatureingabemodus gestartet. Dies bedeutet lediglich, dass Sie Ihre Suchanfrage eingeben können. Cortana sucht dann sowohl auf Ihrem PC als auch im Internet danach.

13. ⊞  + C  - Mit dieser Verknüpfung wird auch Cortana gestartet. Der Unterschied besteht jedoch darin, dass Cortana im Tastatureingabemodus gestartet wird. Mit dieser Verknüpfung wird Cortana jedoch im Wiedergabemodus gestartet. Diese Verknüpfung ist sehr nützlich, wenn Sie die Funktion "Hey, Cortana" nicht aktiviert haben oder nicht verwenden.


14. ⊞  + G  - Game DVR ist eines der weniger bekannten Tools, aber eines der besten Video-Capture-Tools, die Windows 10 hinzugefügt wurde. Mit dieser praktischen Verknüpfung können Sie das Game DVR-Tool schnell öffnen und mit der Aufnahme beginnen. Dieses Tool richtet sich zwar speziell an Gamer, kann aber auch zum schnellen Aufnehmen anderer Programme verwendet werden. Sie können jedoch nicht den gesamten Bildschirm aufzeichnen, sondern nur ein einziges Programmfenster.

15. ⊞  + Alt  + G  - Wenn Sie schnell mit der Aufzeichnung der Aktivität im aktuellen Programm- oder Spielfenster beginnen möchten, verwenden Sie diese Verknüpfung. Der Game DVR wird gestartet und die Aktivität des aktiven Fensters wird aufgezeichnet.

16. ⊞  + Alt  + R  - Nach dem Starten des Spiel-DVR können Sie diese Schnellverknüpfung verwenden, um die Aufzeichnung der Aktivität im aktuellen Programm oder Spielfenster zu beenden.


Windows 10-Tastenkombinationen - Oktober 2019 wilirax


Die Grundlagen

Ctrl  + A : Alle Elemente in einem Fenster auswählen.

Ctrl  + C : Kopiert das ausgewählte oder hervorgehobene Element (z. B. Text, Bilder usw.).

Ctrl  + V : Ausgewähltes oder markiertes Element einfügen.

Ctrl  + X : Ausgewähltes oder markiertes Element ausschneiden.

Ctrl  + Z : Macht die vorherige Aktion rückgängig.

Ctrl  + Y  : Aktion wiederholen.

Ctrl  + N : Wenn der Datei-Explorer Ihr aktuelles Fenster ist, öffnen Sie ein neues Datei-Explorer-Fenster mit demselben Ordnerpfad wie das aktuelle Fenster.

⊞  + F1 : Öffnen Sie die Bing-Suche "So erhalten Sie Hilfe in Windows 10" im Standardbrowser.

Alt  + F4 : Schließt die aktuelle App oder das aktuelle Fenster.

Shift       +  Delete : Löscht das ausgewählte Element dauerhaft (überspringen Sie den Papierkorb).

 oder Ctrl  + Esc : Startmenü öffnen.

⊞  + X : Öffnet das geheime Startmenü.

⊞  + T : Durchlaufen Sie die Apps (einschließlich angehefteter Apps) in der Taskleiste.

⊞  + M : Minimiert alle offenen Fenster.

⊞  + Shift       + M : Minimierte Fenster wiederherstellen.

⊞  +  Home : Minimiert alle Fenster mit Ausnahme des ausgewählten oder derzeit aktiven Fensters.

⊞  + Shift       + Up arrow: Maximiert das aktive Fenster vertikal und behält dabei seine Breite bei.

⊞  + Shift       + Left arrow or Right arrow: Verschiebt das ausgewählte Fenster zum linken oder rechten Monitor.

⊞  + Ctrl  + Right arrow: Zum nächsten virtuellen Desktop (nach rechts) wechseln

⊞  + Ctrl  + Left arrow: Zum vorherigen virtuellen Desktop (nach links) wechseln.

⊞  + E : Öffnen Sie den Datei-Explorer.

⊞  + F: Öffnen Sie den Windows 10 Feedback Hub.

⊞  + Ctrl  + F: Suche nach PCs in einem Netzwerk.

⊞  + H : Öffnen Sie die Freigabe-Seitenleiste.

⊞  + K : Öffnen Sie die Seitenleiste Verbinden (zum Herstellen einer Verbindung zu neuen Bluetooth-Geräten oder Miracast).

⊞  + L : Sperren Sie Ihren Computer.

⊞  + O : Bildschirmausrichtung sperren.

⊞  + R : Öffnen Sie das Run-Fenster.

⊞  + U : Öffnen Sie das Easy of Access Center.

⊞  + W : Öffnen Sie den Windows Ink Workspace, um auf Tablets oder Touchscreen-Laptops zu zeichnen.

⊞  + Print Screen: Machen Sie einen Screenshot des gesamten Desktops und speichern Sie ihn im Ordner Screenshots im Ordner Bilder.

⊞  + (+) or (-): Mit der Lupe vergrößern und verkleinern.

⊞  + Esc : Lupe beenden.

Wenn Sie der Meinung sind, dass ich Windows 10-spezifische Tastaturkürzel verpasst habe, teilen Sie sie in den Kommentaren unten mit.

Windows 10 Keyboard Shortcuts -Oct 2019


Never use your mouse again!

Windows 10 Keyboard Shortcuts -Oct 2019 by wilirax


Even though a mouse makes things easier to navigate and interact, I like to do things with the keyboard as much as possible. Why? So that I can be much faster and avoid moving my hand constantly to use the mouse. If your a keyboard user too then you will love these keyboard shortcuts. Here's a handy list of the most useful keyboard shortcuts for navigating Windows 10. You might also find it useful to know how to open programs with keyboard shortcuts in Windows 10.


1. ⊞  + D – Mac users may talk about how their fancy mouse-enabled Hot Corners let them glimpse at the desktop without closing anything, but this shortcut lets you do just the same. Press it to toggle between the desktop and all the windows you have open. Be warned that if you interact with the desktop after pressing the shortcut, then you can’t use it again to un-minimize the windows and will need to maximize them again manually.

2. Alt  + Tab     – The classic window-switching shortcut gives a nice thumbnail preview of each window. Keep pressing the shortcut to toggle through the windows, then release it when you’ve highlighted the window you want.

3. Ctrl  + Alt  + Tab     – This quick shortcut lets you see all the apps that are currently opened on your desktop. It looks like Alt + Tab at a glance, but it doesn’t disappear when you let the keys go, and you can patiently select or close any window in the preview using the keyboard or mouse.

4. ⊞  + Ctrl + D  – The addition of Virtual Desktops is one of the best things to happen to Windows 10. Using this quick keyboard shortcut, you can create and open a new virtual desktop.

5. ⊞  + Ctrl  + Left or Right Arrow Keys – If you have multiple virtual desktops opened for different works, then use this keyboard shortcut to navigate between the virtual desktops.

6. ⊞  + Ctrl +  F4  – You can use this shortcut to quickly close a virtual desktop. Don’t worry – any opened programs in the virtual desktop will be transferred to the main desktop workspace.

7. ⊞  + Tab     – This shortcut lets you access the new Task View feature in Windows 10 which displays all your opened programs and your virtual desktops.

8. ⊞  + Arrow Keys – Window snapping has been greatly improved in Windows 10. You can use the ⊞  + Arrow Keys shortcut to quickly snap windows to any corner of your screen. Left and Right arrows snap the window to those sides of the screen, while Up and Down arrows snap windows to corners. Pressing ⊞  + Up or Down twice will make a window go full-screen or minimize respectively.

9. ⊞  + P  – Toggle between different displays, if you have any connected. This simple shortcut saves you going into the display settings to toggle between different multi-monitor setups, allowing you to extend the display to the second screen, duplicate it or show it on the second screen instead of the first.

10. ⊞  +  I  – Using this simple shortcut you can quickly open the All Settings window. Since Microsoft is slowly unifying all the control panel items with the modern Settings app, this is one of the most useful shortcuts of Windows 10.

11. ⊞  +  A   – One of the best things about Windows 10 is the Focus Assist (formerly known as Action Center). Using the keyboard shortcut Win + A, you can easily open and see all the current notifications in the panel. There is no need to click on that small icon on the taskbar.

12. ⊞  + S  – Search/Cortana, which acts as a personal digital assistant, is one of the biggest additions in Windows 10. To quickly launch Cortana, you can use this keyboard shortcut. When you do, Cortana launches in the keyboard input mode which simply means that you can type in your search query, and Cortana will search for it both in your PC and on the Web.

13. ⊞  + C  – This shortcut also launches Cortana, but the difference is that the above launches Cortana in Keyboard input mode, but this shortcut will launch Cortana in the listening mode. This shortcut is quite useful if you haven’t enabled or aren’t using the “Hey, Cortana” feature.


14. ⊞  + G  – Game DVR is one of the lesser-known tools, but it is one of the best video capture tools added to Windows 10. Using this handy shortcut, you can quickly open the Game DVR tool and start recording. Though this tool is particularly aimed at gamers, it can also be used to quickly record other programs. However, you cannot record the entire screen, just a single program window.

15. ⊞  + Alt  + G  – If you want to quickly start recording the activity in the current program or game window, then use this shortcut. It will launch the Game DVR and start recording the activity of the active window.

16. ⊞  + Alt  + R  – After starting the Game DVR, you can use this quick shortcut to stop recording the activity in the current program or game window.


Windows 10 Keyboard Shortcuts -Oct 2019 by wilirax

The basics


Ctrl  + A : Select all items in a window.

Ctrl  + C : Copy selected or highlighted item (e.g. text, images and so on).

Ctrl  + V : Paste selected or highlighted item.

Ctrl  + X : Cut selected or highlighted item.

Ctrl  + Z : Undo the previous action.

Ctrl  + Y  : Redo action.

Ctrl  + N : When File Explorer is your current window, open a new File Explorer window with the same folder path as the current window.

⊞  + F1 : Open "how to get help in Windows 10" Bing search in the default browser.

Alt  + F4 : Close the current app or window.

Shift       +  Delete : Delete the selected item permanently (skip the Recycle Bin).

 or Ctrl  + Esc : Open Start menu.

⊞  + X : Open the secret Start menu.

⊞  + T : Cycle through the apps (including pinned apps) on the taskbar.

⊞  + M : Minimize all open windows.

⊞  + Shift       + M : Restore minimized windows.

⊞  +  Home : Minimize all windows except the selected or currently active window.

⊞  + Shift       + Up arrow: Maximizes the active window vertically while maintaining its width.

⊞  + Shift       + Left arrow or Right arrow: Move the selected window to the left or right monitor.

⊞  + Ctrl  + Right arrow: Move to the next virtual desktop (to the right)

⊞  + Ctrl  + Left arrow: Move to the previous virtual desktop (to the left).

⊞  + E : Open File Explorer.

⊞  + F: Open the Windows 10 Feedback Hub.

⊞  + Ctrl  + F: Search for PCs on a network.

⊞  + H : Open the Share sidebar.

⊞  + K : Open the Connect sidebar (for connecting to new Bluetooth devices or Miracast).

⊞  + L : Lock your computer.

⊞  + O : Lock screen orientation.

⊞  + R : Open the Run window.

⊞  + U : Open Ease of Access center.

⊞  + W : open the Windows Ink Workspace for scribbling on tablets or touchscreen laptops.

⊞  + Print Screen: Take a screenshot of the entire desktop and save it to the Screenshots folder in the Pictures folder.

⊞  + (+) or (-): Zoom in and out with magnifier.

⊞  + Esc : Exit magnifier.

If you think I missed any Windows 10 specific keyboard shortcuts, do share them in the comments below.